
updated 2000.03.30
Author Brane Zdralo
Exporting Output from Spice Opus
1. Overview
2. Generating Pictures of Plot Window
2.1. Linux Specifics of Generating Pictures of Plot Window
2.2. Windows Specifics of Generating Pictures of Plot Window
3. Soexp Utility
4. Exporting Numerical Results into Other Programs
5. Generating Pictures from Tango
6. Other Tools
1. Overview
So after all the fun and excitement with development or research or even both (you lucky guy) it's time to present results to the public. And for many including us this is usually starting point for mostly boring and sometimes frustrating work. Pictures never seem to be in the right format, they have poor resolution, fonts are ugly or word processor simply crashes when importing them, etc... So here are two examples which show you how we have solved this problems:
In the first example you can see a picture in PNG format which was automatically generated from Spice Opus plot window. We set things in such a way that you get a picture of the same size which is configurable through the init file.

Example of automatically generated picture in PNG format from Spice Opus Plot Window
Second example is in PDF format so you need Adobe Acrobat Reader or Ghostscript to see Example of Spice Opus Plot Window in PDF format. In this case picture was automatically generated in PDF format and included in MIKTEX document. You can find more about MIKTEX in section Other Tools.
If you like the results proceed to the following sections where you will find all necessary information how to do it yourself on your platform without much hassle. Since the actual conversion is done by Ghostscript it is also possible to generate pictures in other graphic formats suitable for inclusion in almost any word processor (MS Word, Wordperfect...). Also this approach is not limited to the Spice Opus, but you can use it with any other program.
2. Generating Pictures of Plot Window
Procedure to generate pictures is quite the same on Windows and Linux so the following explanation covers both operating systems. Details about about required software, installation, configuration, troubleshooting and other platform dependent specifics are explained in the dedicated sections. For those who want to change or to improve something there are additional information in Soexp Utility.
Procedure to generate picture of plot window goes like this:
- Set the desired conversion options by editing convini. You will find all necessary information about options and syntax well documented in the file itself. Because init file is always called from command line you can have many different versions of it for specific tasks.
- Print the Spice Opus Plot Window in file. Here you can choose dimensions of picture and printing of Title and Time Stamp.
- Run the Soexp. To alter some options set in init file on per case basis you can specify them on the command line. This way many but not all conversion options can be changed.
If everything has gone well you now have the picture in desired format. On Windows platform it is possible to merge step 2 and 3 and automate this procedure further (Linux to follow). In this case all settings on per case basis could be done only through the init file.
2.1. Linux Specifics of Generating Pictures of Plot Window
2.1.1. Required software
- The first program you need is the Soexp which is supplied with the Spice Opus or you can download latest version from here.
- The Ghostscript - should be
version 6.0 or newer!!! - is the only program you need
besides the Soexp. You can get it from this location. Ghostscript
for Linux comes in three different formats:
- as source tarball *.tar.gz
- as source in Red Hat rpm
- as i386 binary for Red Hat 5.1 rpm
Which one you will take depends on what distribution you use. In our case it was possible to take binaries in rpm format and convert them into debs with Alien which is a part of the Debian distribution. Alien can also convert rpms into format suitable for Slackware and Stampede distributions. Fonts come in two different rpm packages. They only difference between them is that fonts in package 'noarch' aren't internally archived. If you use Debian this one is preferred because it is easier for installation. - To simplify Ghostscript use it is nice to have some kind of frontend to it. On Linux there are plenty of such frontends: GV, Ghostview, KGhostview, etc.. They are standard part of all distributions and you can bet that at least one of them is already present on your system.
- And at last it is always good practice to have a program with which majority of people will read documents you have created. You can get Acrobat Reader from Adobe. If you have system with glibc2.0 as Debian 2.1 - slink be careful to use Reader 3.0.1 (acroread_linux_301.tar.gz).
2.1.2. Installation
Since we at our place use only Debian GNU/Linux 2.1 and 2.2 all installation specifics are dedicated to this distribution.
First install the Soexp:
prompt:$ tar -xvzf soexp.tar.gzDownload appropriate two packages:
ghostscript-6.0-1.i386.rpm
ghostscript-fonts-6.0-1.noarch.rpmVerify that Alien is installed on your system and if it isn't install it:
prompt:$ which alienConvert rpms into debs:
prompt:$ alien -d -k ghostscript-6.0-1.i386.rpm
prompt:$ alien -d -k ghostscript-fonts-6.0-1.i386.rpmAs root install debs:
prompt:# dpkg --install ghostscript-fonts_6.0-1_all.deb
prompt:# dpkg --install --force-overwrite ghostscript_6.0-1_i386.deb
And this is all. If everything went smooth you should have working system. You can verify it by running ghostscript (gs) or any of mentioned frontends to it.
2.1.3. Troubleshooting
At the moment I have no stuff for here. Submit something.
2.2. Windows Specifics of Generating Pictures of Plot Window
At the beginning of this section I must inform you, that on the Windows platform we use only Windows 95/98 and all tests we performed were on this two versions of the Windows. There is no reason why the whole procedure shouldn't work on Windows NT too, but we didn't test this.
2.2.1. Required Software
- The first program you need is the Soexp which is supplied with the Spice Opus or you can download latest version from here.
- Ghostscript - should be version 6.0 or newer!!! - is the only obligatory program besides the Soexp. You can get it from this site. From the same site you can also get the next two very useful utilities.
- The first one is Redmon which redirects printer output to other programs (in our case to the Soexp) and thus makes possible to generate picture as simply as printing it to the printer. Because Redmon comes as zipped archive you also need WinZip or similar utility to install it.
- The second one is GSview. It is a frontend to Ghostscript and greatly simplify its use. This one is not obligatory but it's handy if something goes wrong or you have decided to extend funkcionality of the Soexp. In both cases please send us your results back so we could share them with other users.
2.2.2. Installation
The first program to install is the Soexp. Just extract contents of archive into desired folder.
The next program to install is Ghostscript. If you have decided to install GSview do it after Ghostscript. Installation of both is very easy and straightforward process. Both come in single executable file. Just run them and leave all options on their default values.
If it is good enough for you that every time you want to generate a picture you have to execute Soexp from the command prompt within the DOS window you can safely skip this step and proceed with the installation of printer driver. Otherwise create folder c:\redmon and extract content of Redmon archive into it. We will also use program Redrun which is part of Redmon. If you are using Windows NT you should read readme.txt which comes with Redmon. Now you just run setup.exe and you are done with installation. If you have decided not to install Redmon into c:\redmon just be careful to use your own installation path instead of this one later.
The last step is to install and configure Postscript printer driver. Any Postscript printer driver should work as long it's set properly. We use driver for Apple LaserWriter II NT, the one suggested in GSview documentation. According to this documentation it is preferred one because it supports only basic postscript functions, so there shouldn't be any problems with compatibility. All tests we did were done with this printer driver. If you have decided to use any other printer and something doesn't work as expected, first try to use this one. Those who are unfamiliar with printer setup under Windows 95/98 could find all information presented bellow in this picture by picture guide. Because right printer settings are crucial for the success of operation here are those which should be changed from their default values:
Fonts tab
Always use built-in printer fonts instead of TrueType fontsPostScript tab
Postscript output format: Encapsulated PostScript (EPS)
Postscript header: Assume header is downloaded and retainedIf you have chosen not to use Redmon installation is finished otherwise proceed with Redmon configuration.
- Details tab - Add Port
- Add Port - Other - Redirected Port
- Add Redirected Port - OK
- Details tab - Spool Settings...
- Spool Settings - Disable bi-directional support for this printer.
- Details tab - Port Settings...
- Because there are many settings here is a picture of them:
Short description of the first two settings may be valuable if you decide to change something. Program redrun.exe which appears in "Redirect this port to the program:" is a part of Redmon. Its function is to save printer output into the file with a random name and runs program in "Arguments for this program are:". In our case this is the Soexp and all its command line. If the path to the Soexp is not set in a PATH variable (autoexec.bat) should be included here. "%1" is the name of Soexp input file. If something is still unclear look at the Redmon picture by picture guide. If you have not specified output file on soexp command line under the Port Settings you will get output file with random name in c:\windows\temp directory.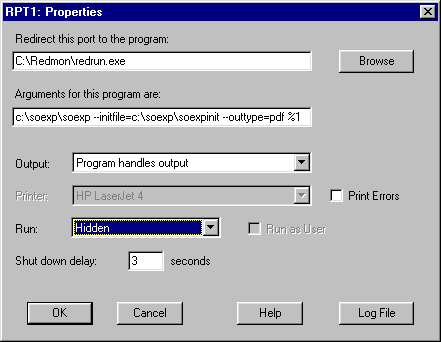
- If you need to generate pictures in different formats frequently the best way is to set up more then one printer and redirected port. You just repeat steps above and specify different printer name and command line options for the Soexp (for example: --outtype=png).
3. Soexp Utility
Soexp is a small program written in C. It's role is to automate task of generating pictures from PS format. Its settings can be changed through initialization file or through command line options. You can see all command line options by running the Soexp without any or with --help option. In the original init file (convini.original) all possible settings are included and explained.- reads PS or EPS file and through header verifies its format
- recognizes Tango PCB or Schematic file
- calls Ghostscript for calculation of graphics size (Bounding Box)
- applies this new size as Bounding Box and pagesize
- translates coordinate system
- changes some Tango file parameters
- calls the Ghostscript for the final conversion
Soexp comes with source included so those who improve something are welcome to share their improvements with us and the rest of the users.
4. Exporting numerical results into other programs
Spice Opus doesn't have special command for exporting data into other formats. It is possible to save data with nutmeg command write, but the format of data saved this way generally isn't suitable for exchange with other programs. Better way than editing this data by text editor is to use command print and redirection. Linux users are probably familiar with this concept, but for others here is the whole procedure in details:
1. Disable pagebreaks:
Spice Opus 11> set nobreak
2. If you don't want header to appear in the first 5 lines of output
choose this option which disables its printing:
Spice Opus 12> set noprintheader
3. You can also suppress printing of index vector:
Spice
Opus 12> set noprintindex
4. Set appropriate page width - approximately (number of
vectors+1) * 16:
Spice Opus 13> set width = 32
5. Save desired vectors:
Spice Opus 14> print
vec1 <vec2> <vecN> >
file
6. Because this settings also affect how printing on terminal window behaves perhaps it is not a bad idea to restore original settings after the job is done. You could do this by using the command unset for nobreak, noprintheader and noprintindex.
5. Generating Pictures from Tango
For those who still use Tango Schematic and PCB editor for DOS, Soexp offers fast and convenient solution to export color schematics and PCBs into other applications. Bellow is an example of PNG picture generated from Tango Schematic and here is PDF picture generated by Tango PCB.
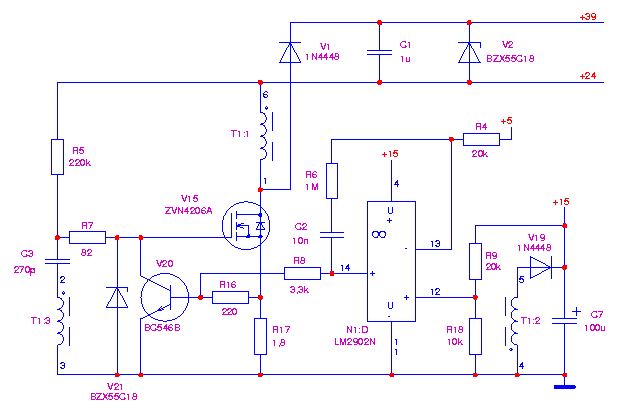
Example of color picture in PNG format generated from Tango Schematic
Soexp recognizes PS files generated by Tango Schematic or PCB through the Postscript keyword "%%Creator:". Through the init file one can select colors which replace original gray levels and font which replaces original font. In the schematic it is possible to scale independently the width of the thin and thick lines. Procedure to obtain desired picture is simple: just plot into the file using PostScript driver - not EPostScript !!! - and then run Soexp. There is one little bug in Tango PCB Postscript output which is not resolved yet - bottom layer is always drawn over the top layer. This will be fixed sometime in the future.
6. Other tools
Windows
- MIKTEX is free TeX for Windows users. On their site you can find plenty of information about Tex and related stuff.
- WinEdt (shareware!) is really nice and after the expiration of the evaluation time very annoying editor for creating TeX documents.
- SnagIt (commercial!!) If you have spare money and you need to capture image from the screen it is realy cool. For occasional use try with free trial version of it.
Linux
- teTeX is a complete Tex distribution for UNIX and compatible systems... Just follow this link and...
- NEdit is full featured and very extensible text editor for UNIX. One of the features is also syntax coloring for LateX.